Classroom Behavior Management System:
How it works:
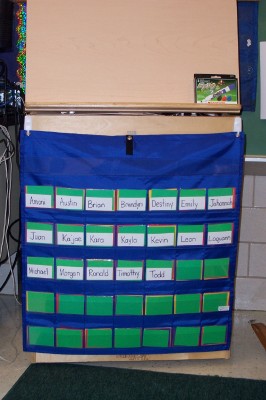
Each day all of my children start on green. If a child is misbehaving, I move his card to yellow or red. I save red for major offenses or repeated offenses. If a child is behaving very well, I change his card to purple. Often if I see a child misbehaving, I look for a child who IS behaving and change that child to purple rather than changing the misbehaving child to yellow. Most children "straighten up" when you change a classmate to purple in hopes that they too can have purple. I change many more children to purple than yellow or red. This makes the system more of a positive reinforcement system than a negative or punitive system (like the traditional system is).
Please note: Overusing the yellow or red in this system reduces the effectiveness. If a child does get yellow or red, he can still redeem himself and return to green. In the same
Consequences:
I try to make the consequences directly relate to the misbehavior and I make sure that children understand this relationship. For that reason, I don't have specific consequences that match misbehaviors or that correspond to the colors on my chart. I often offer choices regarding consequences to give the child some control (rather than engaging in a power struggle). For example: if a child does not complete his work during a lesson--due to "fooling around" or refusing to do it--I will offer him the choice of completing it at recess or center time. I am not punishing him; sitting out to complete the work is a natural consequence of not doing it in class. Another example: if a child is disrupting the class, I will offer him the choice of putting his head down at his table or sitting in our quiet chair (time out chair).
At the end of the day, children who are on purple get a small treat (pencil, eraser, tattoo, etc), children on green get a sticker or stamp, yellow gets nothing, and red gets a note or phone call home.
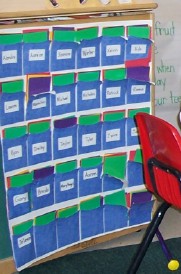
You can make a color card behavior chart by gluing (or using sticky-back) library pockets to a poster board. Then laminate the entire chart and use a razor blade to slit the pockets open. You can also use commercially made pocket charts--see picture at the top for an example (www.lakeshorelearning.com).
 This is my
teacher-made chart. It worked fine but only survived
one year.
This is my
teacher-made chart. It worked fine but only survived
one year.
This system works very well for most of my children. For those who need something "extra", I use an individual behavior chart.
PBIS
Classroom Behavior Hallway Behavior Cafeteria Behavior Recess Behavior Bathroom Behavior Neighborhood Behavior
Part of being a PBIS school involves giving students a type of ticket when they demonstrate positive behaviors. We use Dolphin Dollars. I have found this to be extremely useful for reinforcing good behavior in the hallway (when the color chart isn't as accessible). Simply "catch" students who are demonstrating correct behavior and give them a ticket (these can be created in MS Word and printed out or you can buy commercially prepared tickets). Students save their tickets and use them for special events that you plan. These events can be as simple as a "Lunch Bunch" or more involved. Some events have a flat price (to participate the students must have X number of tickets); others, like the Stuffed Animal Sale, require different amounts of tickets. If students don't have enough tickets for an event, they go to another classroom during that time.
Some of our PBIS (ticket) events that we did this year:
-
Dances (by grade level in the cafeteria or for my own class in our classroom--pushed all tables to the edges of the room)
-
Ice Cream party (buy those little cups of ice cream and bring in whipped cream, candy toppings, syrups)
-
Sports Day (rotation of sports games in gym such as the parachute, basketball, bowling)
-
Movie and Popcorn
-
Treasure Box (small trinkets that the students choose from--Oriental Trading things)
-
Classroom Book Fair (I used some of my bonus points from Scholastic to buy books for this)
-
Stuffed Animal sale (I bought a huge bag of stuffed animals for $5 at a yard sale. Students helped me to "price" them and then saved up for the ones they really liked).
-
Popsicle Day
-
Field Day (outdoor sports events)
You can find more information about PBIS at http://www.pbis.org/main.htm (my description here was VERY minimal--it's designed to be a school wide program with data collection, universal rules/expectations, teaching of procedures/rules, etc).
Dealing with Problem Behaviors
As a teacher in a tough school and a foster parent to a child with severe emotional/behavioral problems, I can tell you that there are no easy solutions for problem behaviors. There are several books that are good resources regarding behavior problems:
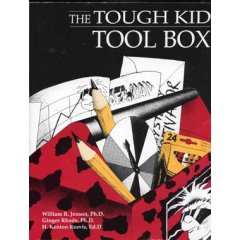
All of these are available on Amazon but you might want to check with your guidance counselor first. Many will have copies of these that you can borrow.
One strategy that I've used with many children with challenging behaviors is an individual behavior chart/plan. Here are some examples
Most of these charts were designed for specific children and their goals are reflected on the charts. You can change the goals to ones that your student needs to work on.
This chart breaks our day down into child-friendly sections. If you don't like to use smiley faces, you can use colors to fill the circles or just delete the circles and put stars when the child earns them.
I used this chart with a half-day student (in my full day kindergarten). The goals were chosen to address this individual's behavior.
This chart in unique because it ties into the classroom behavior management system. The child earns smiley faces to get his card turned to purple. This was VERY effective with this child.
I designed this chart to use at home/daycare with my foster child but you could certainly use it in the classroom. It ties into the 1,2,3 Magic program and has spaces to record the "counts". It is used as a part of a ticket program.
This is my most complex but thorough chart.
This chart divides the day into 3 sections (our schedule lent itself to this very well) and has 3 goals for each section.
This chart is divided into the parts of our day. It has 2 goals for each part.
This is a weekly chart that divides the day into child-friendly parts. This particular chart was designed for at home but you could change the pictures to reflect the school day.
This daily chart was designed for use at home as part of a ticket program. However, this chart matched the one used in school as well. Simply change the "parts of the day" headings and choose appropriate "bonus" goals.